 |
| I'm waiting until closer to Olive's birthday to fill in some of the stats. |

Sharing my experiences as a Dental School wife (and now Dentist's wife!)
Showing posts with label DIY projects. Show all posts
Showing posts with label DIY projects. Show all posts
Tuesday, June 14, 2016
DIY Birthday Sign
It's hard to believe our little Jubilee is a year old already! We had a great time last month celebrating her birthday with a British themed tea party. One trend I have been seeing quite frequently on Pinterest is the faux chalkboard birthday sign. Since I love crafty stuff I thought I would give it a try and write a post about how you can make your own! I had so much fun making it, that I made another one for my niece last week. Here they are side by side.

Wednesday, March 9, 2016
Shutterfly Albums
I don't know about you but I take a lot of photos. Digital cameras are fantastic in that you can typically view your photo instantly to make sure no one was blinking but I feel like many of the photos tend to just sit on the computer (or cell phone), tucked away in a file that will rarely be seen or shared outside the digital world of facebook or instagram. I love looking through my family's old photo albums and I wanted something physical for Robbie and I to have so our kids would get the same experience.
Then I discovered Shutterfly. For the past 5 years, I have used this excellent website to create a photo album with all our favorite memories from each year. It has the artistic and creative qualities of scrapbooking but there's no mess and, in my experience, is much cheaper!
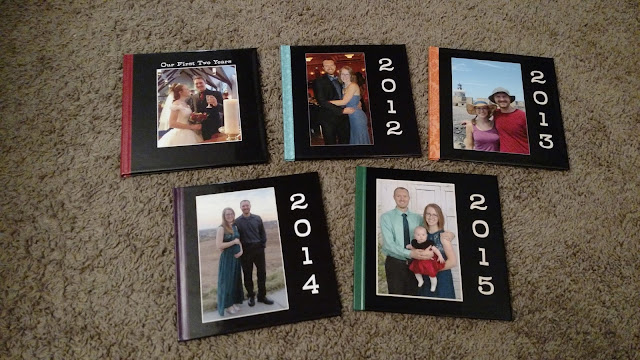
Then I discovered Shutterfly. For the past 5 years, I have used this excellent website to create a photo album with all our favorite memories from each year. It has the artistic and creative qualities of scrapbooking but there's no mess and, in my experience, is much cheaper!

Sunday, October 19, 2014
Herringbone Painting
I have a deep, dark secret to share. I love chevron pattern. Chevron is that zigzag pattern that is literally EVERYWHERE right now. Clothes. Wallpaper. People's fingernails. Rugs. Bedding. Lamps. Furniture. It's out of control, people. This bugs me so bad because I hate it when something I like becomes crazy popular because then people think I just like it because it's trendy.
"I swear I liked it before it was cool." -Every Hipster, Ever.
 |
| You thought I was kidding about the fingernails. |
 |
| Chevron on the left, herringbone on the right. Chevron=zigzag, herringbone=interlocking |
The point of all this is that I had been looking all over the place for a painting to go on our mantel but wasn't having much luck. I just couldn't find something that was big enough for a decent price that also had the colors I wanted. I started scouring Pinterest to see if there were any easy DIY artwork ideas I could use and stumbled upon this one. Here is my finished work:

SUPPLIES NEEDED:
- 1 canvas: Mine was 30x40. I got it from Hobby Lobby with a 40% off coupon so it cost $26. You could obviously go smaller or larger depending on where you want to put your painting.
- Painters tape in desired width: I used 2 inch wide, light adhesion painters tape and it ended up coming off in places. I recommend getting medium-adhesion so you don't run into the same problem.
- Acrylic paints for base colors: This is the fun part--pick whatever colors you want! I used 6 colors in total, plus 2 bottles of gold acrylic for the herringbone.

DecoArt Metallics Splendid Gold, Sea Breeze, Midnite Blue, Coral Blush, Indian Turquoise, Peony Pink, and Desert Turquoise - 1 can of spray paint for herringbone pattern: This is my hindsight advice. I wish I had chosen to just get a can of gold spray paint instead of painstakingly putting on coat after coat for the herringbone pattern with acrylic paint. If you don't have an area you could spray paint, then use the acrylic paint.
- Paint brushes: Don't go crazy here. Just use whatever paintbrushes you have on hand. If you are using acrylic for the herringbone pattern, I do recommend using a sponge brush.
STEPS:
- Begin painting your colors onto your canvas. This can be as random as you like. I chose to use up and down streaks but you could do swirls or whatever you want. Every once in awhile I would step back to see if any one color needed a little more representation on the canvas. If you are using contrasting colors (like orange and blue or red and green) make sure to give them some time to dry in between so they don't blend into a brown. The nice thing about acrylics is that they dry really quickly so if you don't like what you did in one spot, just let it dry and paint right over it.

Part way through painting - Once you are done painting, give it at least an hour to just sit and really dry. In the meantime, start cutting your painters tape into strips. I made all of mine 5.5 inches long. They don't have to be perfect, but they do need to be pretty darn close to all the same length, otherwise your herringbone pattern will look sloppy.
- Once your painting is completely dry, you can start placing your tape on the canvas. I started at one corner and placed the first strip as close to a 45 degree angle as I could get just by eyeballing it.

Here's a drawing on paper to help you visualize it since I didn't take a photo after each piece of tape. - Place your second strip perpendicular to the first so that the side edge is in line with the end of the first. I left about 1/4 of an inch gap in between the pieces of tape because I wanted a nice bold herringbone pattern. You can place them really close together if you want it to be more subtle.

- Place your third strip next to your second and line the end up with the edge of the first. Continue following this pattern all the way across.

- Continue your herringbone pattern until your canvas is completely covered. I had to stop several times to cut more strips of tape. When you get to the edge of the canvas just take your tape right over the edge.


- Once your tape is all in place, start filling in the gaps with your selected herringbone paint color. If you are using acrylic, I recommend at least 3 coats with 10 minutes to dry in between coats. If you are spray painting, I recommend at least 2 coats.

- Once your herringbone paint is dry, begin to gently peel off the tape. Because I used a low-adhesion painters tape, some of it was already starting to peel back and I had several spots that I had to touch up with my base colors.

Sunday, August 10, 2014
Guest Room Remodel
As you may know, Robbie and I purchased our first home a few months ago and it was... a bit of a fixer-upper. Prior to moving in, we were able to request a few improvements be made to the home such as having all new carpet and windows installed (the carpet was filthy and smelled horrible and the original windows were single-pane); however, there were still many projects left for us to complete ourselves.
By far the room that needed the most help was the guest bedroom and was the first project zone for me to tackle. Here is a before picture to show you just how terrible it was:
 I don't know which is worse... the shamrock green, the Pepto-Bismol pink or the horrendous paint splatters that covered everything including the closet doors and window sill.
STEP 1: New Paint
In choosing the paint color, I was trying to keep in mind that this room will eventually be used as a baby room and I don't want to have to repaint. I chose a cheery green paint called "Rejuvenate" by Behr for the main walls and inside the closet I used a blue-green paint called "Aspen Aura." Here's the painting in-progress:
STEP 2: REMOVE CLOSET DOORS AND REPLACE
The closet doors were beyond help so we decided to remove them completely and hang curtains with a tension rod in front of the closet. (see picture for next step to see a picture of the curtains)
STEP 3: WALL ART
I got the idea off Pinterest to hang a group of framed scrapbook papers as a cheap wall art. I chose to do a blue, green, and orangy-pink grouping. I love how it turned out! The frames were $2 each at Wal-Mart and I probably spent $3 total on the scrapbook paper for a total of $21. Another bonus is that I can change out the paper if I ever get tired of it!


STEP 4: BUILT-IN DESK
I've hated not having a desktop computer to use for the last several months, but Robbie and I couldn't decide what kind of desk to get for the Guest Room/Office. The day we took down the closet doors, I was struck with the idea of using half the closet as a desk space. I started planning out how I could build it, gathered my supplies from Home Depot, and went to work.


Here's the BEFORE/AFTER of the room as a whole:

By far the room that needed the most help was the guest bedroom and was the first project zone for me to tackle. Here is a before picture to show you just how terrible it was:
STEP 1: New Paint
In choosing the paint color, I was trying to keep in mind that this room will eventually be used as a baby room and I don't want to have to repaint. I chose a cheery green paint called "Rejuvenate" by Behr for the main walls and inside the closet I used a blue-green paint called "Aspen Aura." Here's the painting in-progress:
 |
| The green looks way more bright in this picture than it is in person. |
STEP 2: REMOVE CLOSET DOORS AND REPLACE
The closet doors were beyond help so we decided to remove them completely and hang curtains with a tension rod in front of the closet. (see picture for next step to see a picture of the curtains)
STEP 3: WALL ART
I got the idea off Pinterest to hang a group of framed scrapbook papers as a cheap wall art. I chose to do a blue, green, and orangy-pink grouping. I love how it turned out! The frames were $2 each at Wal-Mart and I probably spent $3 total on the scrapbook paper for a total of $21. Another bonus is that I can change out the paper if I ever get tired of it!
STEP 4: BUILT-IN DESK
I've hated not having a desktop computer to use for the last several months, but Robbie and I couldn't decide what kind of desk to get for the Guest Room/Office. The day we took down the closet doors, I was struck with the idea of using half the closet as a desk space. I started planning out how I could build it, gathered my supplies from Home Depot, and went to work.
 |
| You can just barely see the edge of the 2x4 I used to support the front left corner of the desk |
 |
| We used three shelf brackets to give additional support to the middle of the desk. |
 |
| The final product |
That's all I have time for today. My next post will be about updating the guest bathroom.
Subscribe to:
Posts (Atom)